How to implement a page view counter in Next.js with Upstash

I am a developer from Berlin.
I want to show you how to increase a view counter without additional UI shift. With the instructions below, you will be able to add a counter into any of your Next pages within less than 5 minutes.
⚠️ This is a Next 12 tutorial. It will get updated once Next 13 is a bit more stable. It already is fast to implement, but it will be even faster with the new React Server Components.
It requires Node.js 16.x and the introduced
atobfunction to run. Check the GitHub Issue for help.
Introduction
I really enjoy @leeerob's blog posts. He implemented a ViewCounter that counts the number of views of each of his posts. When opening a post, you will notice a UI shift on the first render as the Component fetches the data on the client (CSR) using swr.

Now, is it possible to disable the shift with the tools provided by Next.js? Yes, by moving the fetch operation at the same time as we generate the static post pages. We leverage getStaticProps (see docs "When does getStaticProps run?") to add Incremental Static Regeneration and serve a new page with the updated views.
Why can't we use a getServerSideProps? Simply because we can't use both. For blog posts, we should stick to static sites as they are perfect for SEO. Instead, Next.js allows us to do Incremental Static Regeneration (ISR) which allows us to regenerate the page.
We will use a simple redis database powered by upstash to store the number of views.
Show the flow
At first, I thought it would be good to include the middleware in our flow. That way, we could match the incoming request and only increase the views for specific pathnames.
❌ The first idea
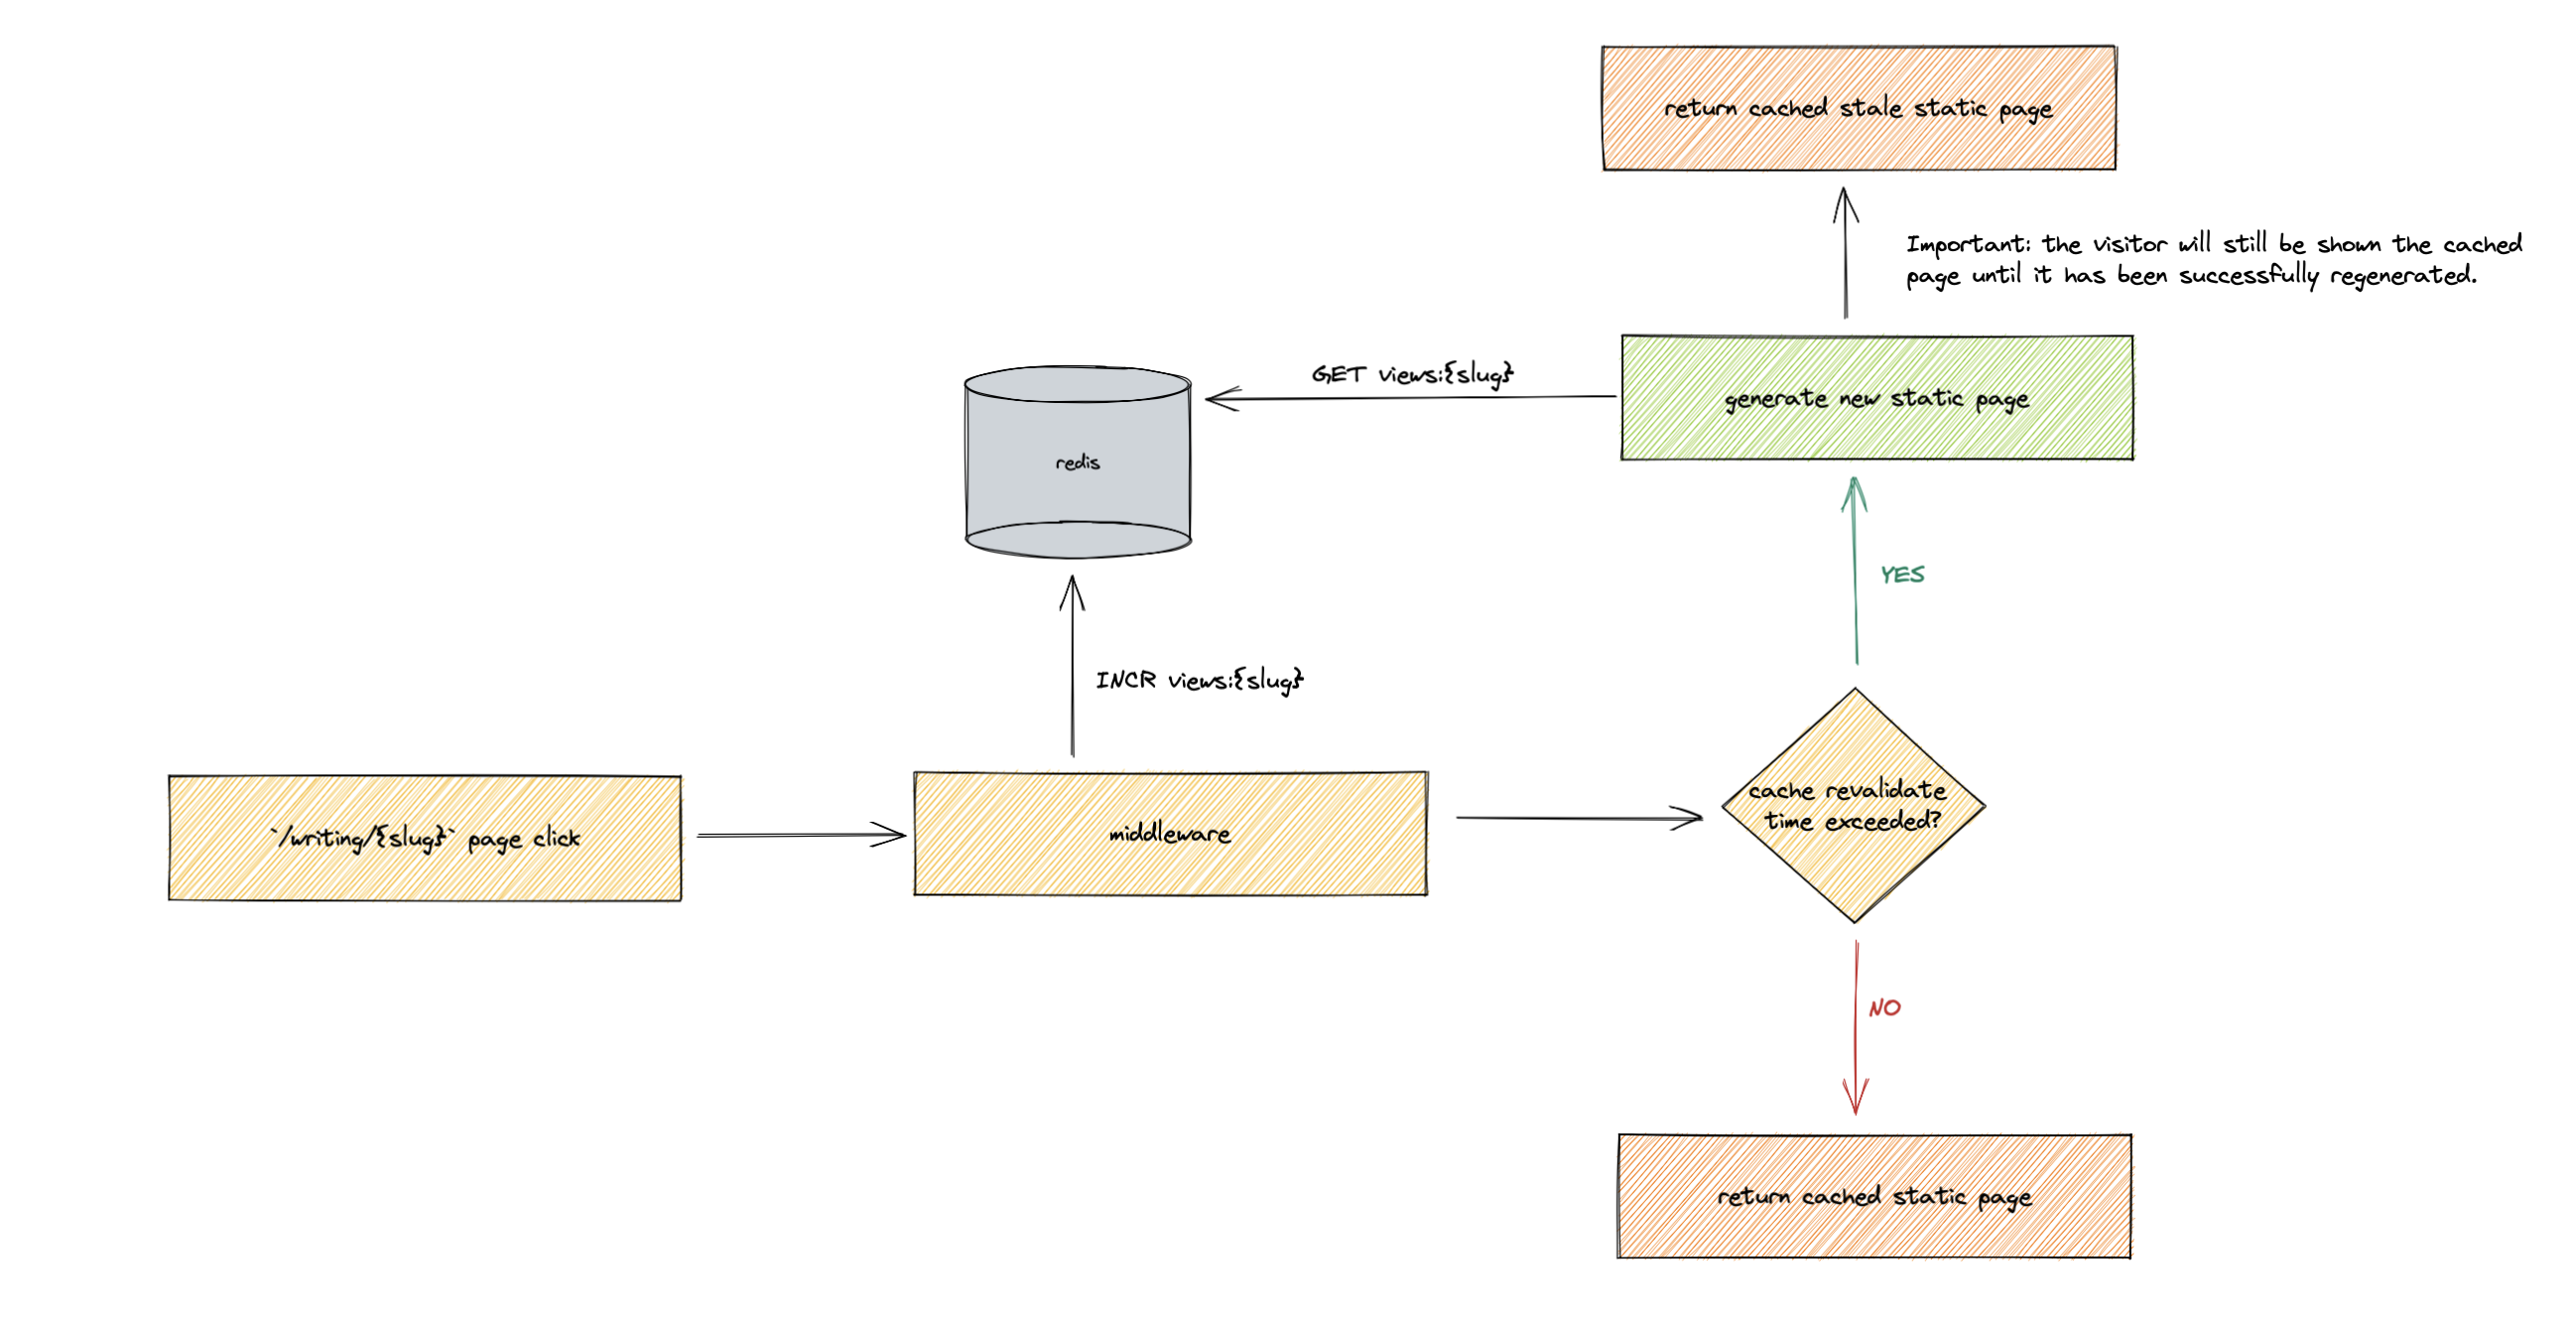
The reason why we are not using this flow is because by default, routes are prefetched as they become visible in the viewport when using the <Link> component and the view counter will already be increased without accessing the pages. Overwriting this behavior with prefetch: false would make the sites slower. Also, whenever the page is automatically refreshed by Next (e.g. when jumping back and forth in the tabs), the middleware will run as the page will be revalidated.
A fully server-side approach will be possible with Next 13 and RSC (React Server Components). Let's stick with what is common for now and use a bit of client-side code, requesting the API to increase the counter.
✅ The second thought
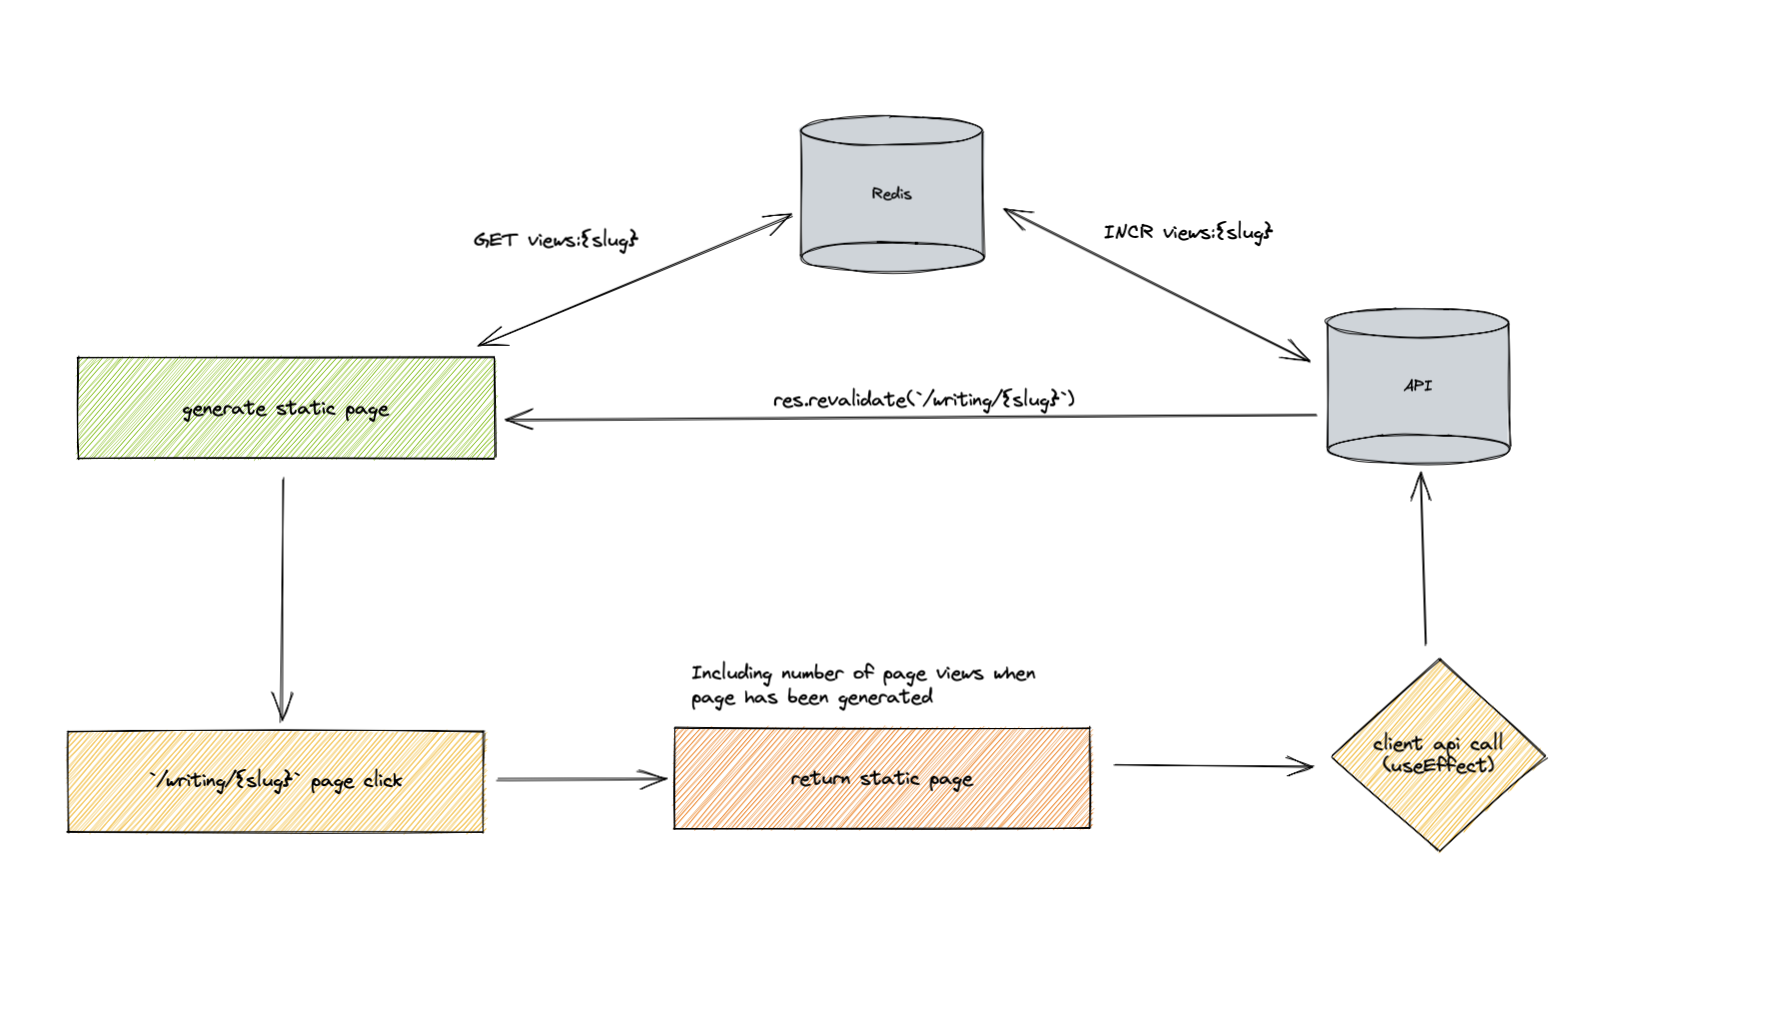
Instead, each time a new /writing/blog-post-slug page is opened, we will make a small API request that will increase our counter by one and automatically revalidate the same page so that, once regenerated (might take a few seconds), we will have the new page view numbers on the static page.
Implementation phase
You only require 3 steps to implement the new feature! Let's get cracking.
- Getting started with Upstash
- Create the
API - Update the
Postpage
We will use the GET and SET redis commands.
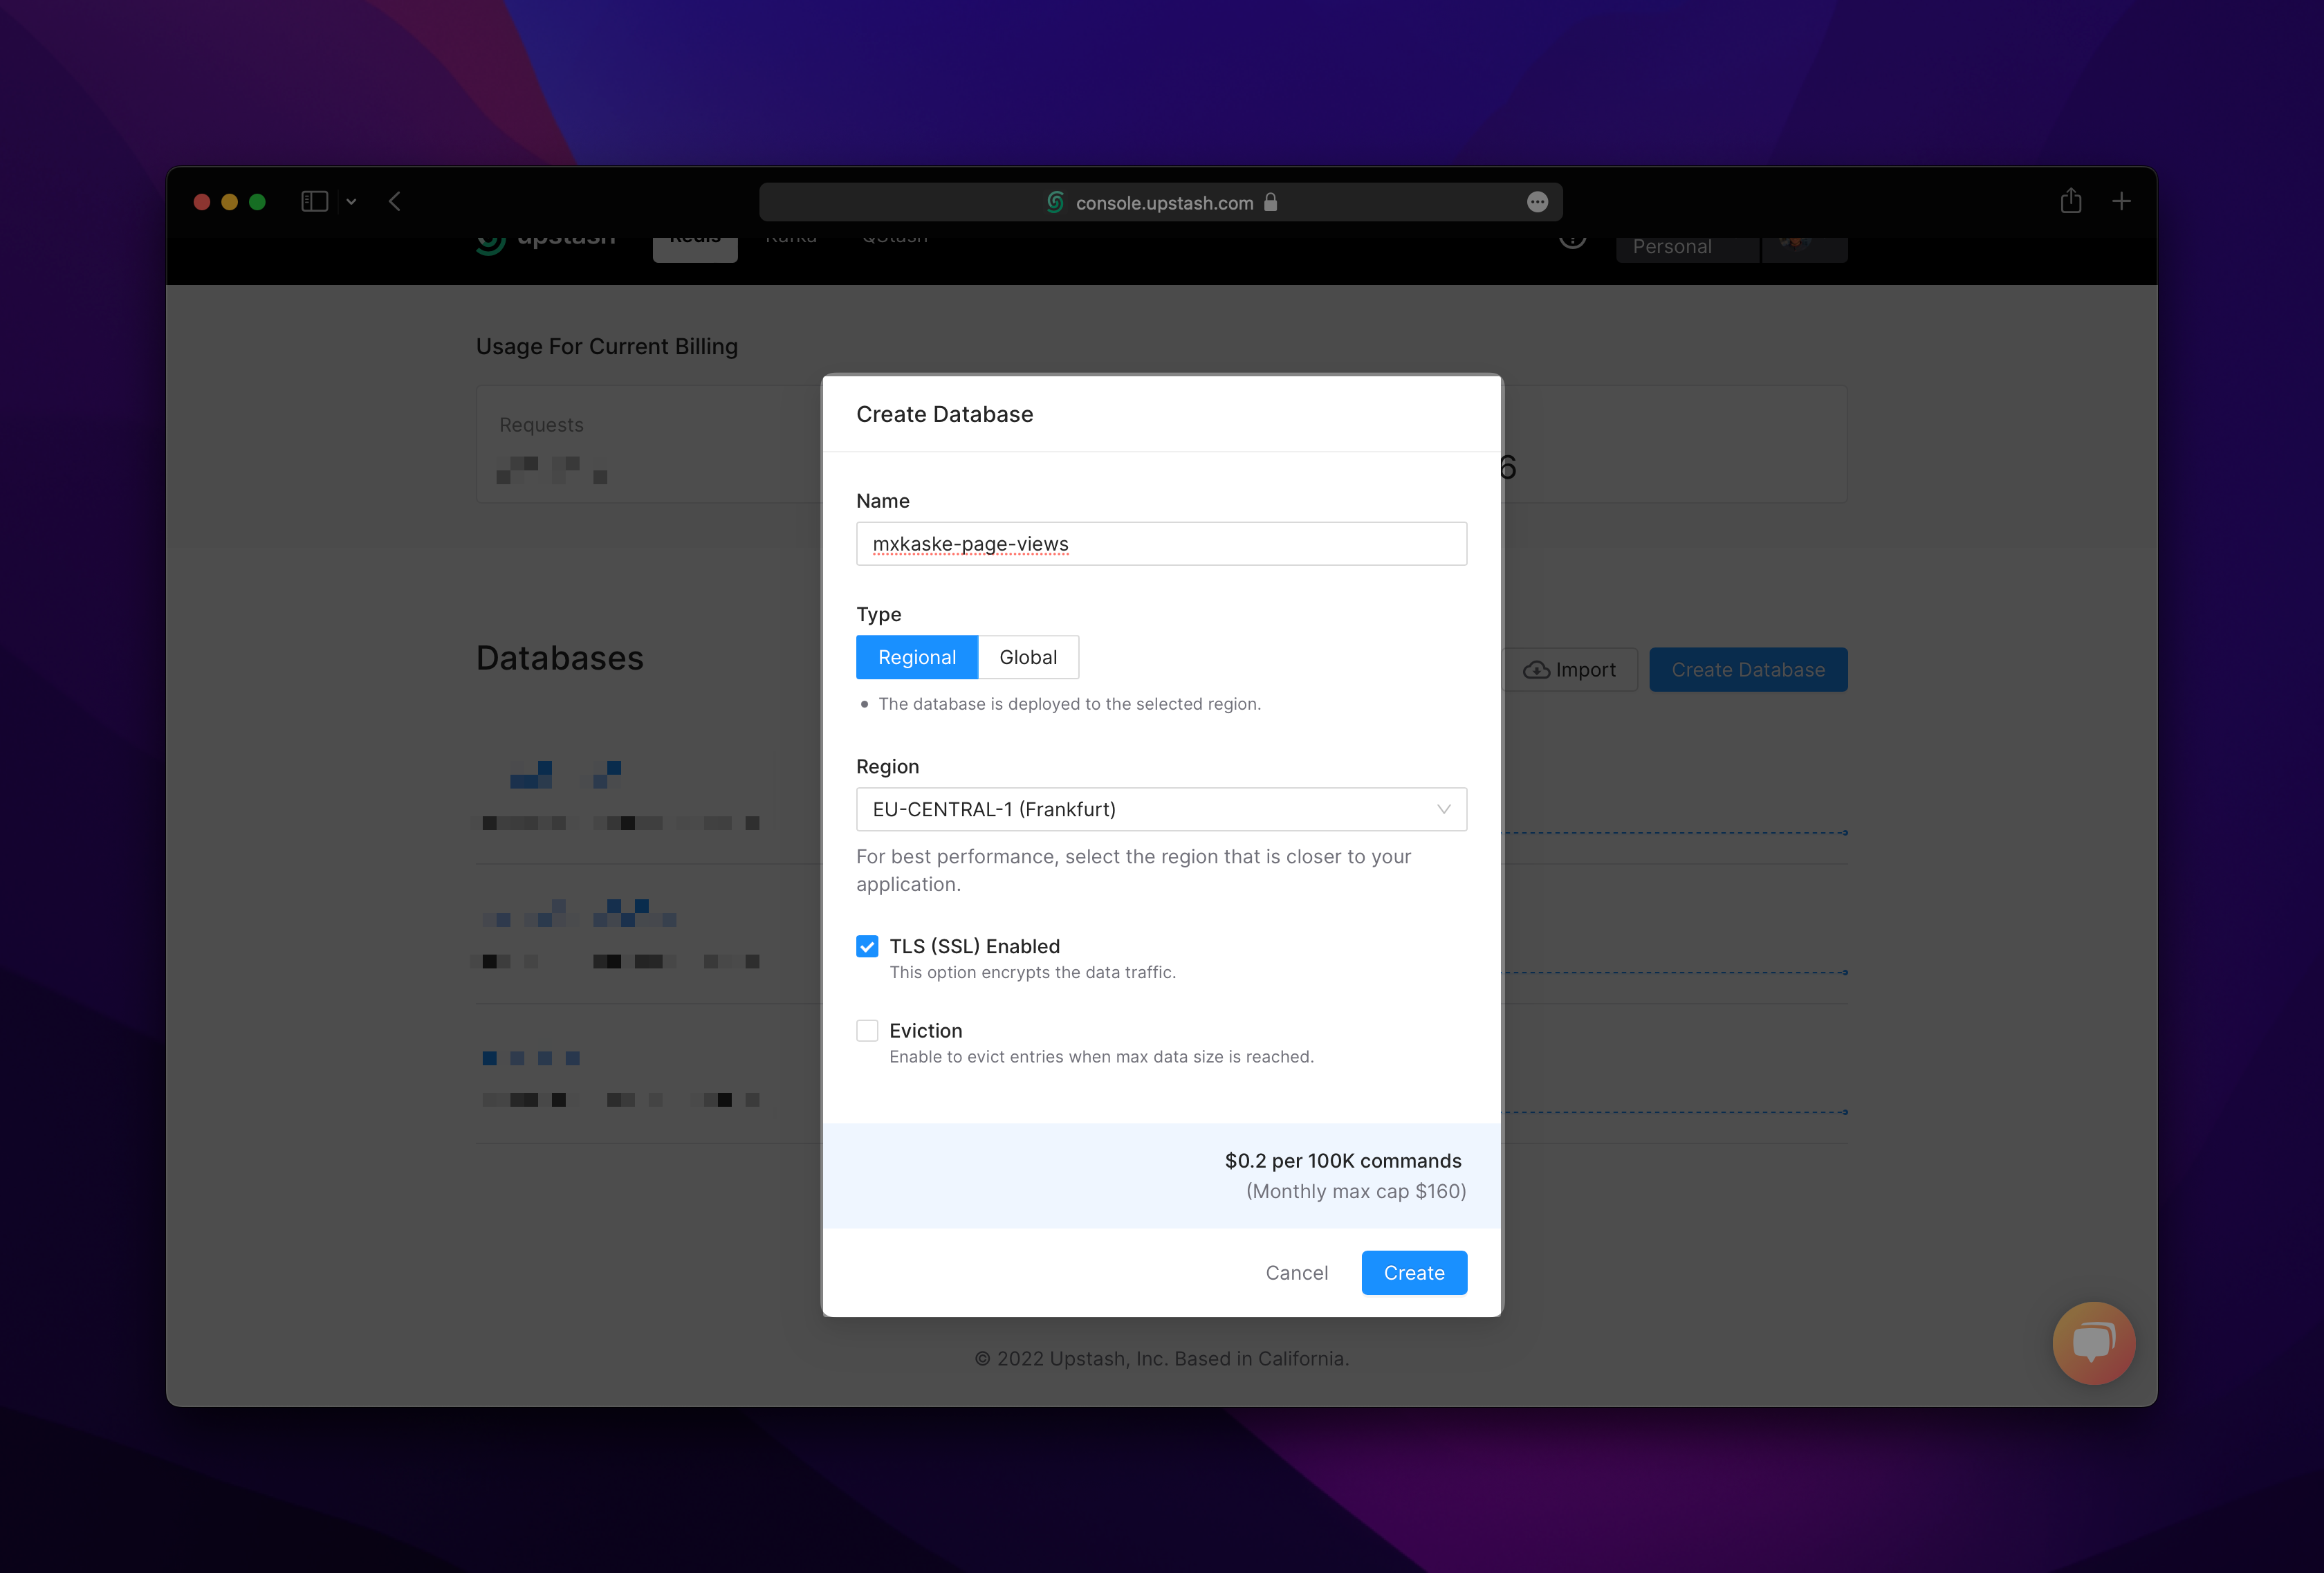
1. Getting started with Upstash
If you don’t already have an Upstash account, create one first. They have a generous free plan to start with - no credit card required. Create a new Redis database and fill out the required inputs.
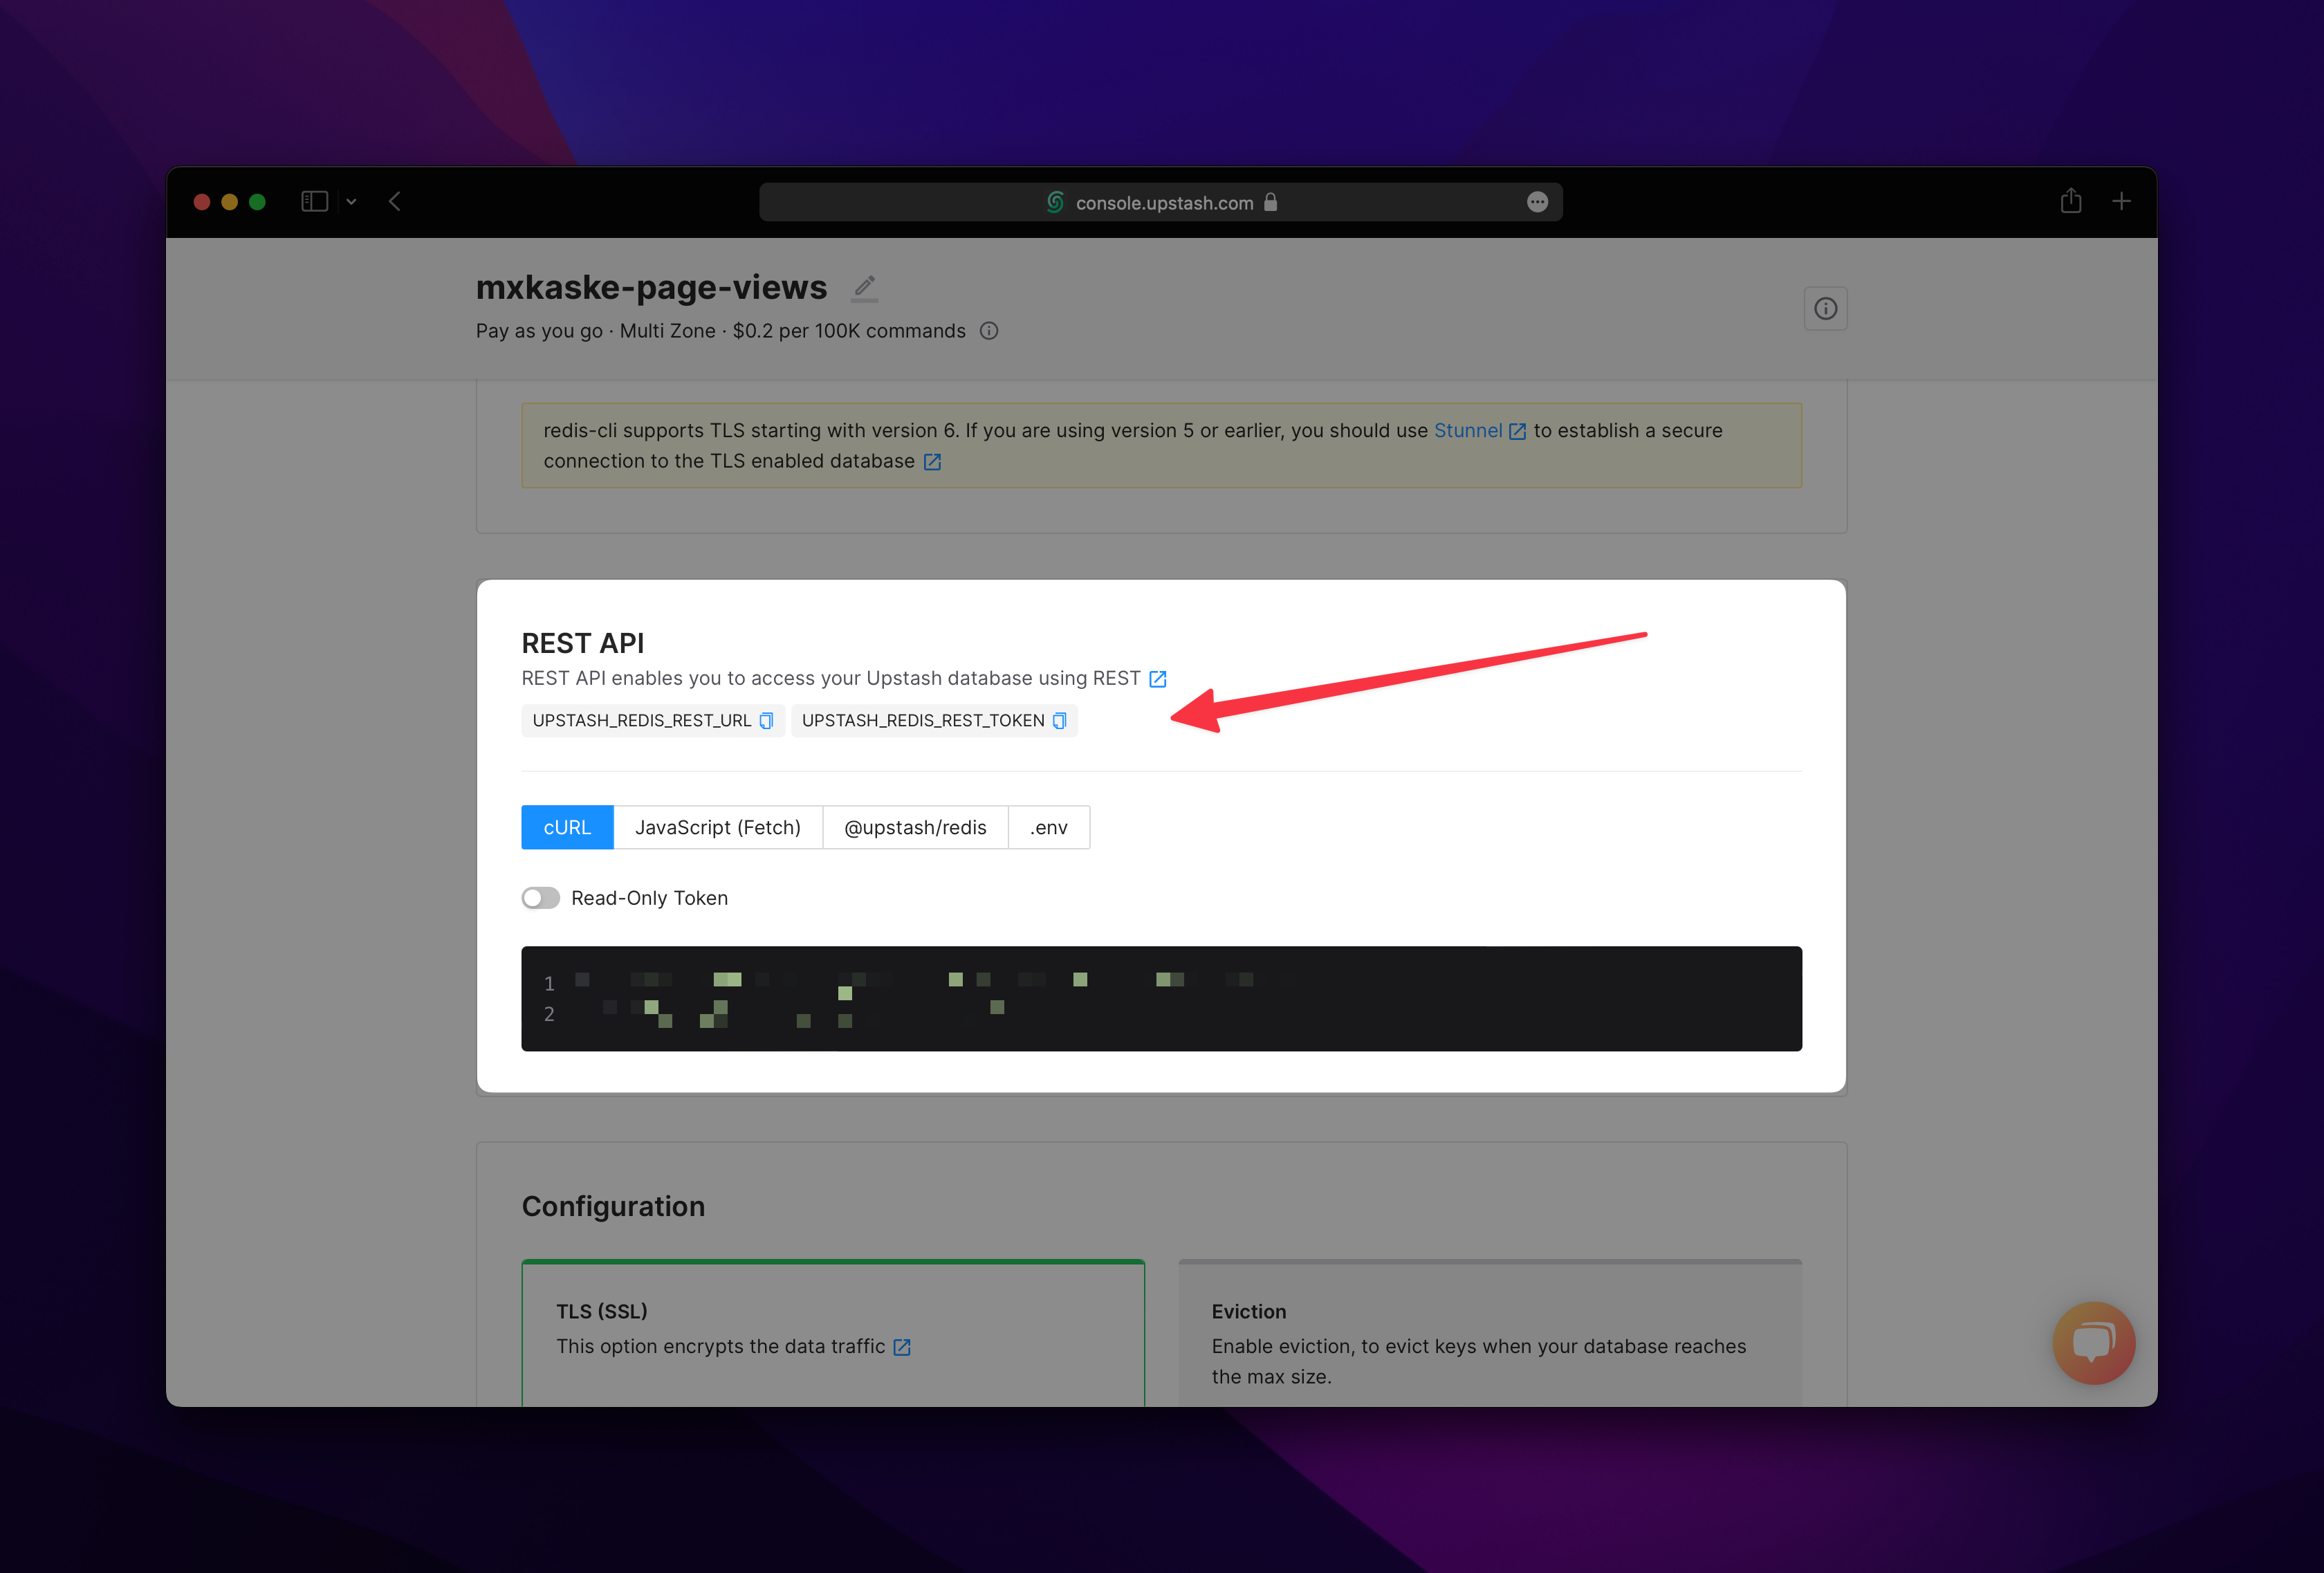
You can easily copy and paste the UPSTASH_REDIS_REST_URL and UPSTASH_REDIS_REST_TOKEN into your .env.local file to start with.
// .env.local
UPSTASH_REDIS_REST_URL=<YOUR_URL>
UPSTASH_REDIS_REST_TOKEN=<YOUR_TOKEN>
Install the @upstash/redis package.
> npm install @upstash/redis
2. Create the API
You need a little API that we can call from the client and increase the counter number for a blog post slug. In there, is called the res.revalidate function to regenerate a static page with the new counter.
// src/pages/api/views/[slug].ts
import { NextApiRequest, NextApiResponse } from "next";
import { Redis } from "@upstash/redis";

const redis = Redis.fromEnv();

const handler = async (req: NextApiRequest, res: NextApiResponse) => {
  try {
    const slug = req.query.slug as string;
    switch (req.method) {
      case "PATCH":
        redis.incr(`views:${slug}`);
        res.revalidate(`/writing/${slug}`); // On-Demand Revalidation (ISR)
        return res.status(200).end();
      default:
        return res.status(405).end(`Method ${req.method} Not Allowed`);
    }
  } catch (error) {
    return res.status(500).json({ error });
  }
};

export default handler;
3. Update the Post page
The posts are created in the src/pages/writing/[slug].tsx file. I am using contentlayer to validate, transform our md/mdx content and include type-safety. I highly recommend it if you are building websites with heavy static content. You get the views for the correct slug inside getStaticProps and pass it to our NextPage Component.
// src/pages/writing/[slug].tsx
import React from "react";
import { allPosts } from ".contentlayer/generated";
import { GetStaticPropsContext, InferGetStaticPropsType } from "next";
import { Redis } from "@upstash/redis";

const redis = Redis.fromEnv();

export default function Post({
  post,
  views,
}: InferGetStaticPropsType<typeof getStaticProps>) {
  React.useEffect(() => {
    // that will increase the counter by one on each `slug` change
    fetch(`/api/views/${post.slug}`);
  }, [post.slug]);
  return <div dangerouslySetInnerHTML={{ __html: post.body.html }} />;
}

export const getStaticPaths = async () => {
  return {
    paths: allPosts.map(({ slug }) => ({ params: { slug } })),
    fallback: false,
  };
};

export const getStaticProps = async (context: GetStaticPropsContext) => {
  const slug = context.params.slug as string;
  const views = (await redis.get<number | null>(`views:${slug}`)) || 0;
  const post = allPosts.find((post) => post.slug === slug);
  return { props: { post, views } };
};
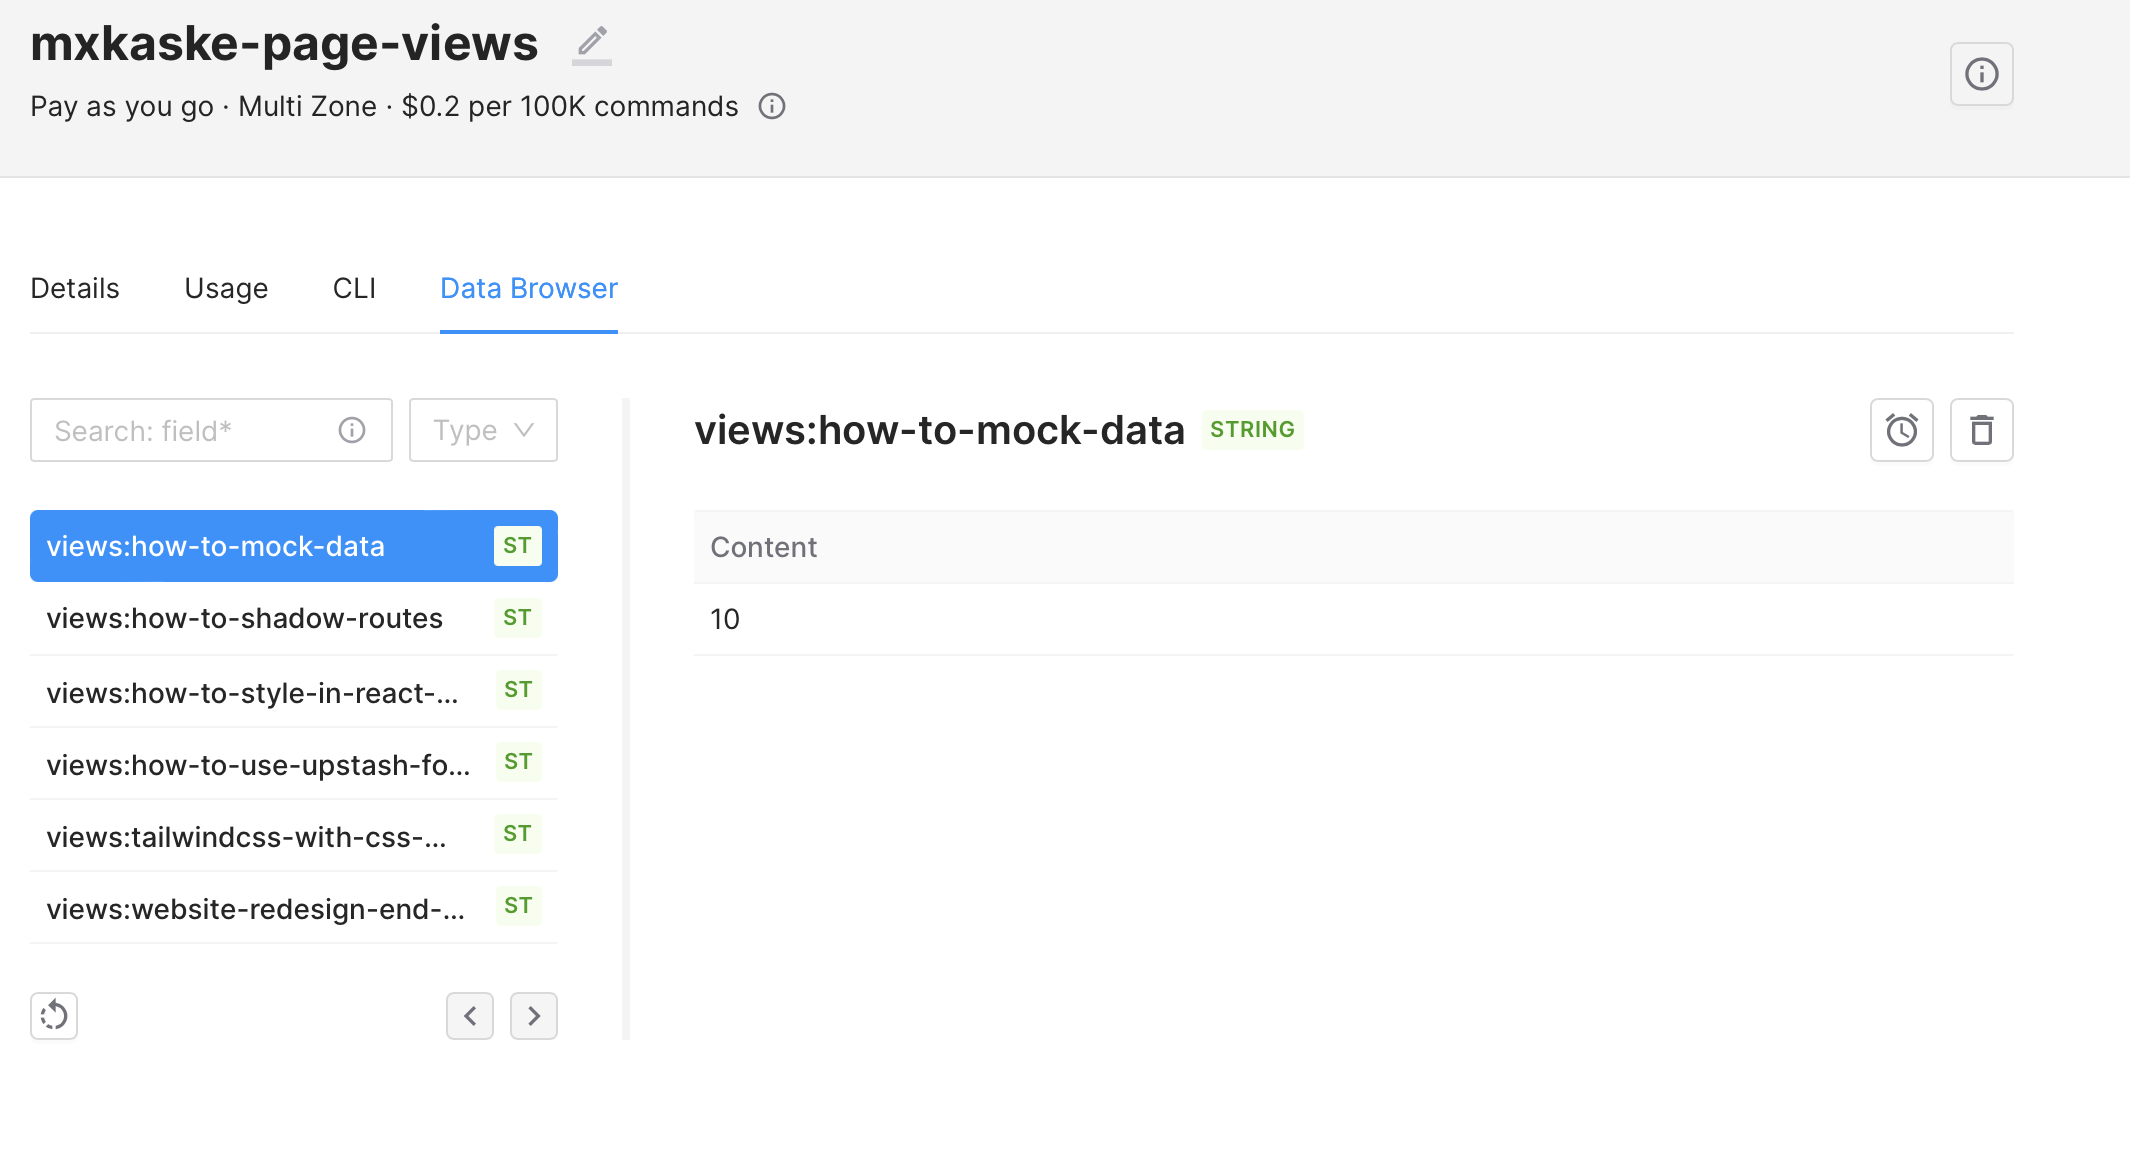
Once implemented, you should see similar data in your Upstash console.
Final words
That's it! You have now a view counter implemented in Next.js with Upstash using ISR.
Check out mxkaske.dev to see it live.
If you want to get all the views from your slugs, you can easily access them with the redis's MGET command like:
// src/pages/writing/index.tsx
export const getStaticProps = () => {
  // ...
  const keys = allPosts.map(({ slug }) => `views:${slug}`);
  const allViews = await redis.mget<(number | null)[]>(...keys);
  // ...
};
Thanks for reading and happy hacking!

